DevOps Basics: Hands-on Introduction to Docker
Docker is a technology that has transformed software development. It allows applications and its dependencies to be packaged into containers that work cross-platform. This not only saves space, it also eliminates the administrative overhead that comes with setting up development environments.
In this tutorial, we will learn the basics of Docker, including how to pull images from Docker Hub, create our own Docker image, run containers locally and push images to Docker Hub.
Prerequisites:
- Command-line basics
- A computer running Linux
- Docker ID (sign up link: https://hub.docker.com/signup)
Step 1: Install Docker Engine
Docker provides the Docker Engine package on Linux to create and manage Docker containers. Install Docker Engine on your system by following the official guides here depending on your Linux distribution.
Step 2: Create a Docker image
Docker images are the templates used to start containers. Just like how a Virtual Machine uses OS images to create virtual machines, Docker containers use Docker images to create Docker containers. There are many pre-configured Docker images available, both official and non-official. These images are hosted on a registry called Docker Hub. The most popular images include Ubuntu, Redis and NodeJS. To download an image from Docker Hub to your local machine, run docker pull <image_name> for official images. For non-official images, run docker pull <docker_id>/<image_name>.
In this tutorial, we will create an image from scratch instead. Run the command git clone https://github.com/axeltanxl/simple-webapp-flask.git simple-webapp to download the demo source code into a folder called “simple-webapp”. This is a Flask app that we will containerise. Once done, open the “Dockerfile” file in the downloaded folder. You should see something like this:
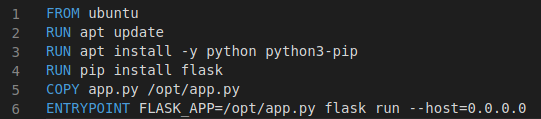
Dockerfiles are used to create Docker Images. This is what the fields in the Dockerfile are used for:
- FROM: Specifies the base image
- RUN: Commands to run when the container starts (usually to install dependencies)
- COPY: Files to be copied from the local machine to a directory in the container when it starts
- ENTRYPOINT: Command to start the container
You can now create a Docker image from the Dockerfile. The command is: docker build . -t <tag>. The “.” tells Docker to look in this directory for a Dockerfile to build the image. The -t option is used to tag the image, which basically means to specify a new name for the image. Make sure to use the format <docker_ID/image_name> for the tag as we will be pushing the image to Docker Hub later on. You should now have a Docker image on your machine. Run docker images to verify.
Step 3: Run a Docker container locally
Now that you have a Docker image, you can run a container based on that image on your local machine. To do so, run the command docker run <image_tag>. A useful option is -d which stands for “Detached mode”. This option allows you to run a container in the background, allowing you to continue performing other operations on the command-line. The output shows you information about the container, most importantly the IP address and port that the container is exposing. To see the web app in action, key in the IP address and port number exposed by the container in the format
Since we did not specify our container to run in detached mode, we have to open another terminal stop the container. Open a new terminal and run docker ps to see all the running containers on your machine. You should be able to see the container ID, the image it used and the name given to the container, which is a random name generated by Docker. Now we will stop the container. Run docker stop <container_ID> to stop the container. You can specify just the first few characters of the container, or the container name if you like. It may take a while stop the container. To verify that all containers have been stopped, run docker ps again. You should not see containers. Even though you have stopped the container, it actually still exists on your machine. To check, run docker ps -a. It should show the container you just stopped, but with the status “Exited”. To permanently remove this container from your machine, run docker rm <container_ID>.
Step 4: Push image to Docker Hub
You can upload your image to Docker Hub to share with people from all over the world. To do so, run docker login to login to Docker Hub on the command line. Enter your username and password. Once successful, you can start pushing your image to Docker Hub. Earlier, I mentioned that your tag should include your Docker ID. This is because the image you are pushing to Docker Hub is not an official image, so you cannot upload the image without specifying your Docker username. To push your image to Docker Hub, run docker push <docker_ID>/<image_name>. Now when you visit this link: https://hub.docker.com/u/<docker_ID>, you should be able to see your image hosted on Docker Hub.